body {
 animation: fadeIn 2s ease 0s 1 normal;
 -webkit-animation: fadeIn 2s ease 0s 1 normal;
}

@keyframes fadeIn {
 0% {opacity: 0}
 100% {opacity: 1}
}

@-webkit-keyframes fadeIn {
 0% {opacity: 0}
 100% {opacity: 1}
}
カスタム投稿タイプ?
WordPressの「投稿」とは別に、新たに自分で、投稿タイプを増やすためのものです。
プラグインを利用してもいいのですが、プラグインに頼らず、そんなに難しくはないので、テーマをカスタマイズ。
まず、追加するカスタム投稿を以下のようにしたい時
カスタム投稿名→post
表示する投稿タイプ名→ポスト
■カテゴリタクソノミー(カテゴリー分け)
カテゴリー名→post_category
表示するカテゴリー名→ポストカテゴリー
■カテゴリタクソノミー(タグ分け)
タグ名→post_tag
表示するタグ名→ポストタグ
※カテゴリタクソノミーは必要なければ、記述しないでもOK。
function.php
/**———————————————————————————————-*/
/* カスタム投稿タイプを追加 */
add_action( 'init', 'create_post_type' );
function create_post_type() {
 register_post_type( 'post', //カスタム投稿タイプ名を指定
 array(
 'labels' => array(
 'name' => __( 'ポスト' ),
 'singular_name' => __( 'ポスト' )
 ),
 'public' => true,
 'has_archive' => true, /* アーカイブページを持つ */
 'menu_position' =>5, //管理画面のメニュー順位
 'supports' => array( 'title', 'editor', 'author', 'thumbnail', 'excerpt', 'custom-fields' ,'comments' ),
 )
 );

/* カテゴリタクソノミー(カテゴリー分け) */
 register_taxonomy(
 'post_category', /* タクソノミーの名前 */
 'post', /* 使用するカスタム投稿タイプ名 */
 array(
 'hierarchical' => true, /* trueだと親子関係が使用可能。falseで使用不可 */
 'update_count_callback' => '_update_post_term_count',
 'label' => 'ポストカテゴリー',
 'singular_label' => 'ポストカテゴリー',
 'public' => true,
 'show_ui' => true
 )
 );
/* カスタムタクソノミー、タグを使えるようにする */
 register_taxonomy(
 'post_tag', /* タクソノミーの名前 */
 'post', /* 使用するカスタム投稿タイプ名 */
 array(
 'hierarchical' => false,
 'update_count_callback' => '_update_post_term_count',
 'label' => 'ポストタグ',
 'singular_label' => 'ポストタグ',
 'public' => true,
 'show_ui' => true
 )
 );
}
/**———————————————————————————————-*/
管理画面のメニュー順位
| MENU_POSITIONの数値 | 管理画面上の移動場所 |
| 5 | 投稿の下 |
| 10 | メディアの下 |
| 15 | リンクの下 |
| 20 | 固定ページの下 |
| 25 | コメントの下 |
| 60 | 外観の下 |
| 65 | プラグインの下 |
| 70 | ユーザーの下 |
| 75 | ツールの下 |
| 80 | 設定の下 |
| 100 | 最下部に独立させる |
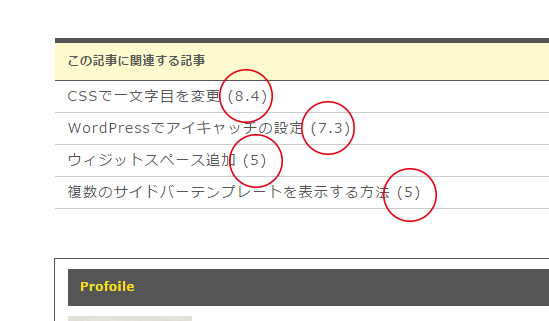
Yet Another Related Posts Plugin(YARPP)プラグインは、関連する記事を表示してくれるプラグインです。
設定によって、関連する項目や、どれくらい関連があるものを表示するのかを設定できるので、便利なプラグインです。
表示方法も色々と融通が利くので、このサイトでも使用してます。
リスト表示時に関連スコアが表示される!
設定画面でスコア表示の切り替えなどなさそう。。。

CSS
abbr{
display: none
}
これだけ!
検索フォームを設置する時、いつも検索して調べたり、過去に制作したものを参考にしたりしているので。。。
テンプレートタグ
<?php get_search_form(); ?>
htmlとしては下記のように出力されます。
<form role="search" method="get" id="searchform" class="searchform" action="(サイトのURL)">
<div>
<label class="screen-reader-text" for="s">検索:</label>
<input type="text" value="" name="s" id="s" />
<input type="submit" id="searchsubmit" value="検索" />
</div>
</form>
これに合わせてスタイルシート設定すれば、思い通りの検索フォームの完成です。
当サイトの検索フォームはテンプレートタグは使わず、以下の通り
テーマファイル
 <div id="searchform_con">
 <form role="search" method="get" id="searchform" action="<?php bloginfo('url'); ?>" >
 <input type="text" value="" name="s" class="s" />
 <input type="submit" class="searchsubmit" value="search" />
 </form>
 </div>
CSS
#searchform_con{
 width: 90%;
 height: auto;
 text-align: center;
 float: left;
 margin-left: 5%;
 margin-right: 5%;
 margin-bottom: 20px;
 background-color: #000000;
}

#searchform{
 width: 100%;
 height: auto;
 text-align: center;
 padding-top: 20px;
 padding-bottom: 20px;
}

#searchform input[type="button"],
#searchform input[type="submit"] {
 background-color: #FFF798;
 background-image: -webkit-linear-gradient(270deg,rgba(255,247,152,1.00) 0%,rgba(255,247,152,1.00) 100%);
 background-image: linear-gradient(180deg,rgba(255,247,152,1.00) 0%,rgba(255,247,152,1.00) 100%);
 border: 1px solid #555555;
 padding-top: 5px;
 padding-right: 10px;
 padding-left: 10px;
 padding-bottom: 5px;
 font-size: 100%;
 color: #555555;
 cursor: pointer;
 width: 10%;
}

#searchform input[type="text"],
#searchform input[type="email"] {
 padding-top: 5px;
 padding-right: 15px;
 padding-left: 15px;
 padding-bottom: 5px;
 border: none;
 font-size: 120%;
 background-color: #FFFFFF;
 width: 30%;
}

#searchform input:link ,
#searchform input:active {
 background-color: #EFEFEF;
 border: none!important;
 -webkit-box-shadow: 0px 0px 0px 0 #F4F4F4!important;
 box-shadow: 0px 0px 0px 0 #F4F4F4!important;
}

#searchform input:hover {
 filter: alpha(opacity=80);
 -moz-opacity: 0.80;
 opacity: 0.80;
 transition: 1.0s;
}

#searchform a:focus,
#searchform input:focus{
 outline:none;
}
見出しなど一文字目を大きくしたり、色を変えたり。。。
html
<h1>大きな一文字目</h1>
CSS
h1 {
 font-size:20px;
}

h1:first-letter {
 font-size:50px;
 color:blue;
}
| usces_the_itemCode() | 商品コード | |
| usces_the_itemName() | 商品名 | |
| usces_the_itemSku() | SKUコード | |
| usces_the_itemSkuDisp() | SKU名 | |
| usces_the_itemCprice() | 定価 | |
| usces_the_itemPrice() | 売価 | |
| usces_the_itemZaiko() | 在庫状態 | |
| usces_the_itemSkuUnit() | 単位 | |
| usces_the_firstSku() | 先頭のSKUコード | |
| usces_the_firstPrice() | 先頭の売価 | |
| usces_the_firstCprice() | 先頭の定価 | |
| usces_the_firstZaiko() | 先頭の在庫状態 | |
| usces_the_lastSku() | 最後尾のSKUコード | |
| usces_the_lastPrice() | 最後尾の売価 | |
| usces_the_lastZaiko() | 最後尾の在庫状態 | |
| usces_the_itemQuant() | 数量入力フィールド | |
| usces_the_itemSkuButton($value) | カート投入ボタン | value はボタンの表示ラベル |
| usces_the_itemImage($number, $width, $height) | 商品画像出力タグ | number は画像のインデックス、0がメイン画像でそれ以降はサブ画像 width は画像の幅、heignht は画像の高さ(縦横比はWordpressに準ずる) |
| usces_the_itemImageURL($number) | 商品画像URL | number は画像のインデックス |
| usces_guid_tax() | 消費税ガイド | 「(税込)、(税別)」の表示 |
| usces_is_item() | 商品か否か | true 商品、false 商品以外 |
| usces_the_item() | オブジェクト準備 | |
| usces_sku_num() | SKUの数 | その商品が所有するSKUの数 |
| usces_is_skus() | SKUがあるか否か | true 存在する、false 存在しない |
| usces_have_skus() | ループ用フラグ | |
| usces_is_gptekiyo( $post_id, $sku, $quant ) | 業務パック割引適用フラグ | 業務パックが適用されるか否か |
| usces_the_itemGpExp( ) | 業務パック割引ガイド | |
| usces_get_itemSubImageNums() | 商品サブ画像の数 | |
| usces_is_options() | 商品オプションフラグ | true オプションあり、false 無し |
| usces_have_options() | ループ用フラグ | |
| usces_the_itemOptName() | 商品オプション名 | |
| usces_the_itemOption($name) | 商品オプションフィールド | |
| usces_is_cart() | カートフラグ | カーとの中に商品が、 true 存在する、false 存在しない |
| usces_the_company_name() | ショップの会社名 | |
| usces_the_zip_code() | ショップの郵便番号 | |
| usces_the_address1() | ショップの住所1 | |
| usces_the_address2() | ショップの住所2 | |
| usces_the_tel_number() | ショップの電話番号 | |
| usces_the_fax_number() | ショップのFAX番号 | |
| usces_the_inquiry_mail() | 問合せ用メールアドレス | |
| usces_the_postage_privilege() | 送料無料条件 | 送料が無料になる金額 |
| usces_the_start_point() | 初回ポイント | 会員入会したときのサービスポイント |
| usces_the_calendar() | 営業日カレンダー | |
| usces_loginout() | ログインリンク | |
| usces_is_login() | ログインフラグ | true ログイン中、false ログインしていない |
| usces_the_member_name() | ログインしている会員名 | |
| usces_is_membersystem_state() | 会員システムフラグ | true 会員制オン、false オフ |
| usces_is_membersystem_point() | ポイントシステムフラグ | true ポイント制オン、false オフ |
| usces_copyright() | コピーライト | |
| usces_totalprice_in_cart() | カート内の合計金額 | 商品のみの合計金額 |
| usces_totalquantity_in_cart() | カート内の合計数量 | 全数量 |
WordPressをアップデートしたら、編集画面のパーマリンクの「編集」ボタンの横に「短縮URLを取得」ボタンがなくなってしまいました。
けっこう便利だったので、会った方がいいなってことで、以下をfunction.phpに記入
function.php
 /** 「短縮URLを取得」ボタンを表示 */
 add_filter( 'get_shortlink', function( $shortlink ) {return $shortlink;} );
